Hacking Keyboard Touchpad with Zephyr RTOS 🪁- Part 2: Implementing Touchpad Sensor Driver
This is my second blog post in Hacking Keyboard Touchpad with Zephyr RTOS series. In this blog post, we will see how to implement a zephyr sensor driver, from the configuration of the build system like CMakeLists.txt, Kconfig, and Device Tree to the code of the driver itself.
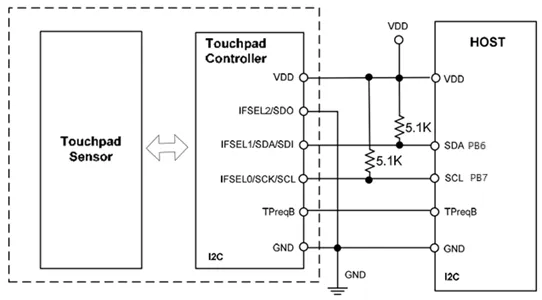
eKT2101 Touchpad Controller
Let’s start by discussing the overall working of your device and its current approach to reading data.
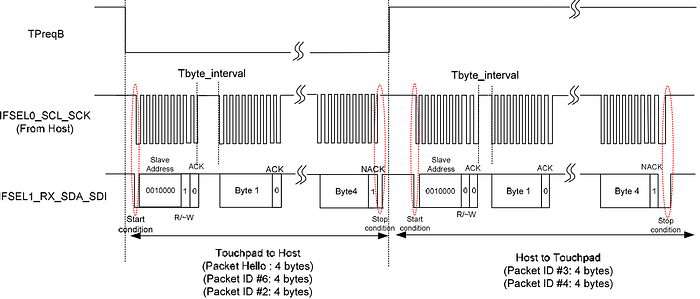
The TPreqB state is always high. If the eKT2101 detects the button state has changed, it will pull the TPreqB signal low first. After the host sends the clock signal to the touchpad, the eKT2101 will send a response data and after data transmission, the touchpad controller will pull-high the TPreqB signal again. the touch pad adopts a bit rate of up to 100Kbps in the Standard mode.
Protocol Description
The TP always sends Packet ID #6 unless specifically asked by the host to send another type. In the case of sending another Packet ID, the TP will only send once for each request by the host and then revert to the type of Packet ID #6. The touch pad will send Packet ID #6 packet whenever it detects a change of sensing status.

Prepare device driver skeleton
Before diving into device driver development, let’s prepare a device driver skeleton. By doing this we will make sure that our device driver is successfully added to the Zephyr build system.
zephyr
├── drivers
│   └── sensor
│      └── elan
│          ├── CMakeLists.txt
│          ├── Kconfig
│          └── ekt2101
│             ├── CMakeLists.txt
│             ├── ekt2101_trigger.c
│             ├── ekt2101.c
│             ├── ekt2101.h
│             └── Kconfig
└── dts
    └── bindings
        └── sensor
            └── elan,ekt2101.yaml
Device Tree Binding
A Device Tree Binding is a description that tells application how to interact with hardware. In Zephyr, these descriptions are written in YAML format and specify what information is needed about the hardware.
zephyr
└── dts
    └── bindings
        └── sensor
            └── elan,ekt2101.yaml
description: eLAN EKT2101 capacitive touchpad sensor
compatible: "elan,ekt2101"
include: [sensor-device.yaml, i2c-device.yaml]
properties:
int-gpios:
type: phandle-array
description: |
The INT signal defaults to active high as produced by the
sensor. The property value should ensure the flags properly
describe the signal that is presented to the driver.Device Tree
In Zephyr, the device tree acts like a blueprint for the hardware in a system, defining the devices connected to the board, their addresses, and how they should be used. The device tree macros, part of the device tree API, simplify access to device tree properties and nodes, facilitating easier interaction with hardware configurations in a structured way.
&i2c1 {
 status = "okay";
 clock-frequency = <I2C_BITRATE_STANDARD>;

  ekt2101: ekt2101@10 {
     compatible = "elan,ekt2101";
     reg = <0x10>;
     int-gpios = <&gpioa 1 GPIO_ACTIVE_HIGH>;
  };
};
We have three main properties: compatible, which specifies the device’s compatibility string; reg, which indicates the device’s address (0x10); and int-gpios, which defines that GPIO pin 1 of the gpioa controller is used for the device’s interrupt functionality.
CMakeLists.txt and Kconfig
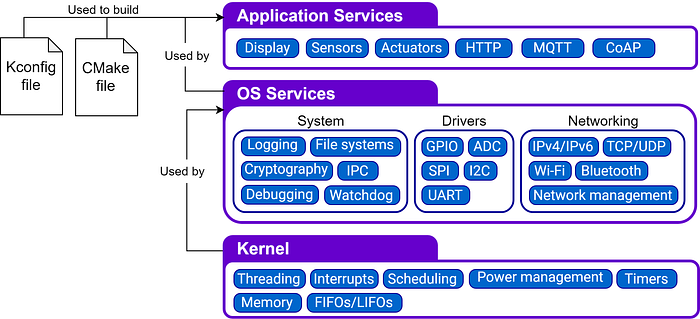
In Zephyr, you’ll notice that many folders contain this dynamic duo: CMakeLists.txt and Kconfig.
zephyr
└── drivers
   └── sensor
      └── elan
          └── ekt2101
             ├── CMakeLists.txt
└── KconfigCMakeLists.txt: These files tells the build system how to compile and link the code. It’s a Makefile of sorts that you use to add source files and include folders to a project. In our case there are two source files ekt2101.c and ekt2101_trigger.c.
CMakeLists.txt
zephyr_library()

zephyr_library_sources(ekt2101.c)
zephyr_library_sources(ekt2101_trigger.c)Kconfig: Each Kconfig file contains configuration symbols (options). These options not only specify the configuration, but also they define dependencies between symbols. Symbols can be grouped into menus and sub-menus to keep the interactive configuration interfaces organized.
menuconfig EKT2101 starts the configuration menu and includes support for I2C. DT_HAS_ELAN_EKT2101_ENABLED ensures that the driver can only be enabled if the specific device tree support for it is also enabled. If you use CONFIG_EKT2101=y in your app, the driver for this touchpad will be included in your system.
Kconfig
menuconfig EKT2101
 bool "EKT2101 capacitive touchpad"
 default y
 depends on DT_HAS_ELAN_EKT2101_ENABLED
 select I2C
 help
   Enable driver for ekt2101 I2C-based capacitive touchpad sensor.
This folder is designated for the vendor, in this case, elan. It allows for easy organization of sensor drivers. In the future, we can add more sensors from elan under this folder, keeping everything related to the vendor neatly grouped together.
zephyr
└── drivers
   └── sensor
      └── elan
         ├── CMakeLists.txt
└── KconfigCMakeLists.txt
add_subdirectory_ifdef(CONFIG_EKT2101 ekt2101)Kconfig
source "drivers/sensor/elan/ekt2101/Kconfig"We would need to modify both files in sensor folder to conditionally compile our code, if the Kconfig option is enabled.
zephyr
└── drivers
   └── sensor
      ├── CMakeLists.txt
└── KconfigCMakeLists.txt
add_subdirectory(elan)Kconfig
source "drivers/sensor/elan/Kconfig"Sensor Driver Skeleton
The first step is to define the macro DT_DRV_COMPAT, which specifies the Device Tree compatible string that our driver supports, allowing Zephyr to recognize the device correctly.
#define DT_DRV_COMPAT elan_ekt2101Our driver will create an instance of the struct device, which represents a device during runtime. The definition of struct device is as follows:
struct device {
  /** Address of device instance config information */
  const void *config;
  /** Address of the API structure exposed by the device instance */
  const void *api;
  /** Address of the device instance private data */
  void *data;
}
We need to manage the config, data, and api fields within the struct device.
- The config field holds configuration data that is set at build time.
- The data field contains information that can be modified at runtime.
- The api field includes the functions that implement the subsystem API utilized by our device. In this case, since our device is a sensor, this will be the
sensor_driver_apiwhere thesample_fetchandchannel_getis required.
This means that our driver will include:
struct ekt2101_config {
   struct i2c_dt_spec i2c;
   struct gpio_dt_spec interrupt;
};

struct ekt2101_data {
  struct ekt2101_reg_data hw_data;
};

static const struct sensor_driver_api ekt2101_driver_api = {
  .sample_fetch = ekt2101_sample_fetch,
  .channel_get = ekt2101_channel_get,
  .trigger_set = ekt2101_trigger_set,
};
We also need to implement an initialization function, which will be called during the boot process to set up our device:
static int ekt2101_init(const struct device *dev)
{
  const struct ekt2101_config *config = dev->config;

  if (!device_is_ready(config->i2c.bus)) {
    LOG_ERR("I2C bus device not ready");
    return -ENODEV;
  }
  return 0;
}
Finally, define an instantiation macro, which creates each struct device using instance numbers. Do this after defining ekt2101_driver_api .
SENSOR_DEVICE_DT_INST_DEFINE is a macro that defines a sensor device instance. It uses the provided parameters to create unique instances for different configurations.
ekt2101_init: This function is called to initialize the sensor.&ekt2101_data_##inst: A reference to instance-specific data, with##concatenatinginstto create a unique identifier.&ekt2101_config_##inst: Similar to data, this is a reference to the configuration structure specific to the instance.POST_KERNEL: This indicates the timing of when the device will be initialized, suggesting that it should happen after the kernel has started.CONFIG_SENSOR_INIT_PRIORITY: This is a configuration value that determines the priority of the initialization.&ekt2101_driver_api: This points to the driver API for the sensor.
#define EKT2101_DEVICE_INIT(inst)     \
 SENSOR_DEVICE_DT_INST_DEFINE(inst,    \
         ekt2101_init,    \
         NULL,     \
         &ekt2101_data_##inst,   \
         &ekt2101_config_##inst,   \
         POST_KERNEL,    \
         CONFIG_SENSOR_INIT_PRIORITY,  \
         &ekt2101_driver_api);
The macro EKT2101_CONFIG(inst) is used to initialize ekt2101_config_##inst, providing the necessary I2C configuration and GPIO interrupt settings for each instance of the EKT2101 sensor.
.i2c: Uses I2C_DT_SPEC_INST_GET(inst) to get I2C configuration.
.interrupt: Uses GPIO_DT_SPEC_INST_GET_OR(inst, int_gpios, { 0 }) to retrieve interrupt GPIO settings, defaulting to { 0 } if not found.
#define EKT2101_CONFIG(inst)     \
 {        \
  .i2c = I2C_DT_SPEC_INST_GET(inst),  \
  .interrupt = GPIO_DT_SPEC_INST_GET_OR(inst, int_gpios, { 0 }),  \
 }
EKT2101_DEFINE(inst) macro is used to define an instance of the EKT2101 sensor, including data and configuration structures as well as initializing the device.
- Data Structure: Declares
ekt2101_data_##instfor instance-specific data. - Configuration Structure: Initializes
ekt2101_config_##instusingEKT2101_CONFIG(inst), setting up I2C and GPIO. - Initialization: Calls
EKT2101_DEVICE_INIT(inst)to register the device.
#define EKT2101_DEFINE(inst)        \
 static struct ekt2101_data ekt2101_data_##inst;    \
 static const struct ekt2101_config ekt2101_config_##inst =  \
  EKT2101_CONFIG(inst);    \
 EKT2101_DEVICE_INIT(inst)
Finally, pass the instantiation macro to DT_INST_FOREACH_STATUS_OKAY() .
DT_INST_FOREACH_STATUS_OKAY(EKT2101_DEFINE)DT_INST_FOREACH_STATUS_OKAY expands to code which calls EKT2101_DEFINE once for each enabled node with the compatible determined by DT_DRV_COMPAT. It does not append a semicolon to the end of the expansion of EKT2101_DEFINE, so the macro’s expansion must end in a semicolon or function definition to support multiple devices.
The complete code is available on my GitHub repo.
References:
https://docs.zephyrproject.org/latest/build/dts/howtos.html
https://bootlin.com/blog/zephyr-implementing-a-device-driver-for-a-sensor/
https://interrupt.memfault.com/blog/building-drivers-on-zephyr
https://mind.be/zephyr-tutorial-105-writing-a-simple-device-driver/

